24.10.10

My Potting Shed


Located by the old apple tree, my potting shed is as utilitarian as it is backyard sanctuary.

With a horseshoe over its doors for gardening luck, everything I need is here: shovels, hoes, tools, plant cages, trays, stakes, pots, fertilizer, and wheelbarrow.  Everything, except the tiller.  The tiller was sold a few weeks ago after deciding to retire the main vegetable garden in favor of raised beds.

The small garden adjacent to the shed has been used to grow corn, pumpkins, watermelon, black raspberries, tomatoes, sunflowers, dill and annual flowers.

Previously used as an outbuilding, my potting shed owes its inspiration to my sister's cozy potting shed and my brother-in-law's carpentry work.  Inside, the shed has a bohemian feel: with its birdhouses, cat prints, baskets, fabric flowers, seashells, a blue and pink floral area rug, a stain glass landscape in an antique frame, and a color scheme of red, azure blue and vibrant green. 


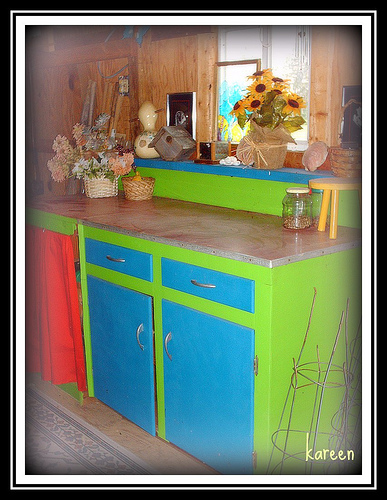
My daughter said she would help paint the shed if she could select the colors, so I happily turned that decision over to her.  We painted a couple of particle board storage shelves and the circa 1960's wood kitchen cabinet the original owners had removed from the house. The cabinet's red formica countertop makes for easy cleanup. 

On the outside, my brother-in-law added siding and new shingles about 10 years ago. The renovations have helped preserve the structure (there was some rotting).  The window he cut in gives the shed charm and a view.


My brother-in-law also created a place to organize and hang my tools.  It was a thoughtful surprise that has helped keep the shed neat and the tools handy.

My little potting shed is sometimes my home away from home.

I keep a blue rocking chair inside the shed.  Once, I placed it under the apple tree and rocked for a few indulgent minutes...daydreaming about my next project ;)


17.10.10

Composting 101

Gardening and composting go hand in hand.

Not long after we moved to our three acres in the country, I took up composting on a grand scale. 

At the property line in between the trees, there are several large piles of organic debris: tree limbs, leaves, corn stalks and other plant material, including weeds, that are too big for the compost bin.  These piles I let decay naturally.  I do nothing but add additional plant material to the piles.  Rabbits and other small animals make homes out of some of the piles.  Despite the piling on of material, the piles never get higher than two feet.  Nature takes care of the compacting and composting for me.

At the back of the potting shed, the "Earth Machine" as it is called, takes care of our organic kitchen scraps.

As part of the county's mission to reduce waste,
these compost bins were given away to encourage composting.
This bin has been producing compost for almost 15 years.

Composting in this vented bin is almost as carefree as the other compost piles.  Scraps (no meat or dairy) like potato skins, coffee grounds, vegetable and fruit peels, etc. are collected and kept in a closed gallon bucket in the garage.  At least once a week, the bucket is emptied into the Earth Machine.


As of late, mom and I have been picking and peeling apples.  The bad apples and peels went into the bin followed by a carbon layer of dried small sticks and leaves.  It is important to alternate layers of organic matter (green = nitrogen & brown = carbon).  Green grass clippings are a good source of nitrogen.  Occasionally, I add one or two shovels of dirt.  Dirt contains microbes and insects which help break down organic matter.  Periodically, I mix and tamp down the organic mixture adding a couple gallons of water if the mixture gets dry.  Moisture is needed to keep the organic material "hot" and decomposing.

This carbon layer went on top of the apple & peel layer.


At the bottom of the Earth Machine there is a sliding door.  The bottom is where the "black gold," or compost falls and compresses.  This is the good stuff: organic matter ready to be shoveled out and used around plants or to amend the vegetable garden.

This compost was used to fertilize the new mums planted this fall.


14.10.10

Predicting Winter

As gardening in zone five begins to wind down, I keep an eye out for the first woolly worm.  I usually find them among the fallen leaves or crossing the road.  The hairy caterpillar of the Isabelle Tiger Moth is part of weather-predicting folklore.  Native Americans believed the size of the black and brown "bands" predicted what kind of winter lay ahead.  More brown means a fair winter.  More black than brown means a harsh winter. Studies have shown this method of predicting winter is 85% accurate.


This year, I have seen several woolly worms with smaller black bands on both ends


Not being a fan of winter, I hope this means a cold start to winter, followed by a long, mostly mild period, ending with more cold.

Only spring will tell!


11.10.10

Extending the Garden's Colors

In late summer, early fall, most of the annuals and perennials have faded or stopped blooming.

Chrysanthemums, or hardy mums are the perfect plant to extend color in the landscape.  In zone 5, mums are an iconic symbol of fall.

This magenta mum located on a west-facing bed in the front yard was planted five years ago as a single potted plant. It continues to grow via the stolons (shoots that bend to the ground producing roots at the nodes).  I fertilize using Miracle Gro during the summer.  I also amend the surrounding soil with homemade compost.


Mums come in a variety of colors including white, yellow, gold, purple and red.  Mums are cultivated to grow in zones 3-9.  Cultivars vary in hardiness so it is best to buy mums from your local nursery. The plants grow 2 to 3 feet high and prefer full sun and well-drained soil.  Mums can withstand light frosts.


When planting potted mums (versus root cuttings), plant in late summer in order to establish the roots.  In the spring, pinch off the tips of the plant to produce and promote side growth.  This will cause the plant to fill out (become bushy).  During hot, dry weather, mums need extra watering.  With care, mums can be long-lasting perennials.  The golden mum shown above looks a little worse for wear because my cat, Noll likes to roll around in the adjacent catnip.  Sometimes he accidentally flops on the mum.


In late summer, I removed some of the spent annuals and wild phlox from the perennial bed and planted four yellow mums.  The cheery yellow brightens up the outer edges of the bittersweet.  In late fall, a protective mulching (leaves/grass) will help protect the plantings from the winter cold.  In a few years, they should be as full and spreading as the magenta.  Mums are a great value:  low in price, nominal care and long-lived.

Fall wouldn't be the same without them.

Perennial Heuchera

The cultivar Heuchera, also known as 'coral bells' or 'alum root,' is native to North America.  It is available in hundreds of foliage colors - yellow, silver, red, black and purple.  Heuchera's palmately-lobed and glossy leaves make it a highly desired and striking border plant.  Plants grow 7" high (not counting the spiked flowers).  I prefer to grow heuchera as an accent plant in the shaded parts of my perennial bed.

Heuchera's flowers are not showy, but they are extensive, on thin stems, varying in color - white, pink, red.  The heuchera I grow have green and purple-edged foliage and tiny, airy-white flowers.  In summer, I pinch back the spent flowers to encourage a fall bloom.

Thriving in shade to full sun, this perennial prefers moist and well-drained soil.  Fertilize occasionally with Miracle Gro.  In a prolonged drought, water heuchera one inch. once a week.  Mulch around the plants in the fall and divide the plants every few years to keep it happy and robust.  This plant has shallow crowns.  Mulching helps to keep the plants from heaving in the winter.  Relatively disease and pest free, heuchera is an easy-breezy addition to any zone 5 perennial or garden bed.